空间填充曲线
对于一个\(2^n\times2^n\)的二维网格由于地址空间都是一维的(例如0x0000到0xffff),其实际在计算机中会将多维压缩成一维,可以形式化表示为
\[ \begin{align} M_{\text{2D}}&:(x,y)\to v \\ M_{\text{2D}}^{-1}&:v\to (x,y) \\ \end{align} \]
对于\(M_{\text{2D}}(x,y)\)也可记作\(\text{encode}(x,y)\),\(M^{-1}_{\text{2D}}(v)\)为\(decode(v)\)
Linear Curve
一种最为简单的存储方式就是逐行地或逐列地存储二维数据,对于一个指定大小的二维方块(\(w\times h\)),从0开始的坐标\((x,y)\) 对应的一维地址为(一行包含\(w\)个元素) \[ v = x \times w + y \] 同理,将一维坐标\((v)\)转换二维方块坐标也很简单,只需要对行/列进行整除和取余操作即可 \[ \begin{align} x &= \lfloor v / w \rfloor \\ y &= v - x \times w \end{align} \] 上面这种方式在一般情况下足够使用,但是对于纹理/体素等数据的读取时,通常会利用到二维/三维坐标的局部性(即当我们访问坐标\((x,y)\)时,我们有很大概率将访问该坐标周围的坐标),而使用线性存储方式则会丢失这种局部性。
例如对于一个\(16 \times 16\)的方块中坐标\((4,4)\)和坐标\((6,6)\),其二维曼哈顿距离为 \[ (6-4)+(6-4) = 4 \] 而经过线性存储映射后距离为 \[ (6*16+6)-(4*16+4)=38 \] ,可以观察到经过一维映射后两个数据距离相差较远。
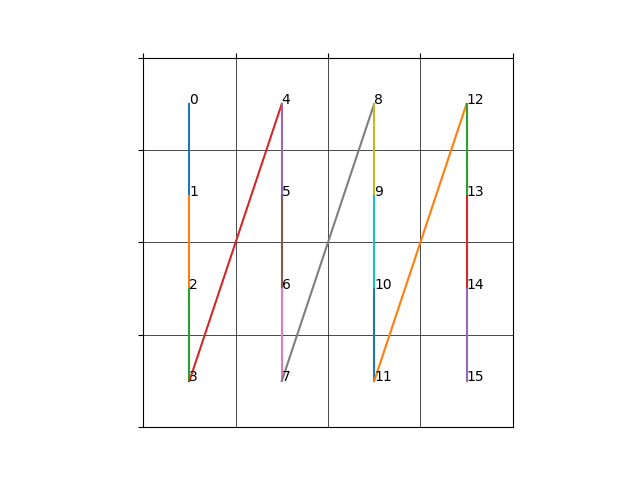
下图展示了 linear curve 的示意图
直接说距离似乎难以理解这种差距,考虑一个实际读取场景,假设CPU的cache一次可以存放16个数据,当我们读取纹理中\((4,4)\)位置的数据后,下一个准备读取其周围\((6,6)\)的数据,由于\((6,6)\)的数据在内存中地址距离\((4,4)\)数据地址较远,无法一次加载到cache中,即出现cache miss,这样我们就只能从内存中重新加载数据,无法利用高速缓存,影响数据读取性能。
针对这个问题,可以使用Hilbert曲线或者Morton曲线这类特殊的映射方式进行坐标映射